HTML Tab Tag
What is HTML?
HTML or HyperText Markup Language is used to design web pages. It was released in 1993. The HTML file extension is named ".html". CSS and JavaScript are used to construct an HTML file. In other words, HTML explains the skeleton body of the webpage or how the page is formed. The codes have been written as elements. Another name for these components is HTML tags. The tags make use of HTML markup. All of the major tags in HTML have to be opened and closed. This is known as the golden rule. Each tag in a series of several tags needs to be closed.
Using a markup language such as HTML, we can
- Connect the information to other documents, arrange it in our document, and provide context and significance.
- There are two components to an HTML document. It includes hypertext links (HyperText) and structured information (Markup) to other documents.
What is Tab?
We use tabs to keep things organized in our daily lives. Assume you are organizing documents in a filing cabinet. Every file has a designated location, and tabs make it easier to get there quickly. Similarly, we utilize tabs to make our code tidy, well-organized, and user-friendly when coding, especially in HTML.
Why do we use Tab in HTML?
Writing all of your code in a single line makes it challenging for anyone to read and understand, so we use tabs in HTML to make it easy and clear. Understandably, clear code is a key component of skillful coding. It guarantees that your work is understandable to other programmers and that you can comprehend it when you return to it later.
What are Website Tabs?
A smart method to display content in bite-sized bits at the touch of a button on a website is through tabs. Their ability to combine content from several separate web pages into a single one, all without the user even realizing it, makes them so brilliant. However, the exact method by which that is achieved is much more ingenious.
The site frequently loads all the content from all the pages at once; however, there are other ways to accomplish this. It hides or shows particular information based on the tab the user chooses. This works like a magic trick to make it feasible to create many single-page web applications.
How do You Create Tabs with HTML?
The real work of duplicating this effect begins now. As previously discussed, this approach contains HTML, CSS, and JS, though there are different ways to accomplish the same behavior.
Create a folder
Make a folder to hold the files for your website before you do anything. Next, create blank files within for .html, .css, and.js.
You cannot change the file extensions (.html,.css, or.js) different from what is shown above. You have complete control over the file names.
Set up the HTML
It is rather easy to set up the HTML itself. Our clickable button elements will be contained in a div element that we will build up. Next, add a div element for every "page" we are loading. The content will subsequently be contained in each of those individual div components.
You can fill them with whatever you want, but we'll limit ourselves to text components to keep things simple.
Code: index.html
<!DOCTYPE html>

<html lang="en">

<head>

    <meta charset="UTF-8">

    <meta name="viewport" content="width=device-width, initial-scale=1.0">

    <title>Tabbed Page</title>

</head>

<body>

<div class="tab-container">

    <div class="tab" onclick="openTab('tab1')">Tab 1</div>

    <div class="tab" onclick="openTab('tab2')">Tab 2</div>

    <div class="tab" onclick="openTab('tab3')">Tab 3</div>

</div>

<div id="tab1" class="tab-content active-content">

    <h2>Content for Tab 1</h2>

    <p>This is the content for Tab 1.</p>

</div>

<div id="tab2" class="tab-content">

    <h2>Content for Tab 2</h2>

    <p>This is the content for Tab 2.</p>

</div>

<div id="tab3" class="tab-content">

    <h2>Content for Tab 3</h2>

    <p>This is the content for Tab 3.</p>

</div>

<script>

    function openTab(tabId) {

        // Hide all tab contents

        var tabContents = document.getElementsByClassName('tab-content');

        for (var i = 0; i < tabContents.length; i++) {

            tabContents[i].style.display = 'none';

        }

        // Remove the 'active-tab' class from all tabs

        var tabs = document.getElementsByClassName('tab');

        for (var i = 0; i < tabs.length; i++) {

            tabs[i].classList.remove('active-tab');

        }

        // Show the selected tab content and mark it as an active

        document.getElementById(tabId).style.display = 'block';

        document.querySelector('[onclick="openTab(\'' + tabId + '\')"]').classList.add('active-tab');

    }

</script>

</body>

</html>
You must add a <link> tag in the <head> of the article to link the CSS to your HTML file if you are not working in an environment similar to Code Pen. To connect your JavaScript to the HTML, you must also include a <script> element after your post. Without any formatting or functionality, they are required for the web page to contain its fundamental content.
The CSS link might look like this:
<link rel="stylesheet" href="css_filename.css">
The script element might look like this:
<script src="js_filename.js."></script>
The final line of your code should contain the script element linking to the .js file. If not, the script may load before your HTML components, which could cause your website to stop working properly.
To view content on the page, click the buttons. For now, ignore the "tab" and "onclick" properties. Each content page that will be displayed on the website incorporates a paragraph tag, an H2, and a div element. Again, basic text was utilized, but you could also add pictures or videos in this area. Later, especially in the CSS section, we will refer to these elements using their "id" and "class" values again.
With the CSS section, all of this HTML would appear more complex and, at worst, easier to navigate.
Set up the CSS
The style and formatting of the tabs and their contents depend on the CSS. To show or hide the content itself, utilize the CSS attribute.
Code
body {

            font-family: Arial, sans-serif;

            margin: 0;

            padding: 0;

            background-color: #f4f4f4;

        }

        .tab-container {

            display: flex;

            justify-content: center;

            margin-top: 20px;

        }

        .tab {

            background-color: #ddd;

            padding: 10px 20px;

            cursor: pointer;

        }

        .tab-content {

            display: none;

        }

        .active-tab {

            background-color: green;

        }

        .active-content {

            display: block;

        }
The body of the page is styled in lines 1-6. In this instance, it serves to identify the font that appears on the page and style the background. The tab container, or the page section where the HTML tab buttons are located, is styled. Here, the tabs are centered on the page using justify-content and margin-top. The div element on is expressly mentioned, along with all other components with the "tab" class attribute in the HTML file.
As you can see, we have the display property set to none. As a result, when the website loads, the tab content is not displayed, forcing users to click on the buttons to see the content. Without this feature, the page's content would load automatically from all three tabs. The tab button is styled once clicked. You can change the background-color attribute to any color you choose. Finally, the actual content of the HTML tab will be styled.
Now, even though CSS and HTML are interacting, your webpage is still not functional. All the information would be displayed once on the page if you were to load this right now. JavaScript's power is required to complete the procedure.
Set up the JavaScript
All of the magic is occurring in JavaScript. When events occur, you can modify some aspects of your HTML and CSS. Your event in this scenario will be to use your mouse to press a button. You can include your JavaScript file directly within the HTML, as we previously suggested, or link to it from another location. This may be how the JS code appears to you:
Code
<script>

    function openTab(tabId) {

        // Hide all tab contents

        var tabContents = document.getElementsByClassName('tab-content');

        for (var i = 0; i < tabContents.length; i++) {

            tabContents[i].style.display = 'none';

        }

        // Remove the 'active-tab' class from all tabs

        var tabs = document.getElementsByClassName('tab');

        for (var i = 0; i < tabs.length; i++) {

            tabs[i].classList.remove('active-tab');

        }

        // Show the selected tab content and mark it as an active

        document.getElementById(tabId).style.display = 'block';

        document.querySelector('[onclick="openTab(\'' + tabId + '\')"]').classList.add('active-tab');

    }

</script>
Here, there is a JavaScript method named "openTab" that takes the parameter "tabId." This function will power the logic for tab-switching. All of the components with the class "tab-content" are retrieved and stored in the "tabContents" variable. The next line of code sets the show property to none, hiding the material that will be displayed on your tab.
The active tab is indicated in the next code block. The "tabs" variable is assigned to all components with the "tab" class. Removing the class "active-tab" ensures that the relevant tag has the appropriate styling. Lastly, the content of the selected tab is displayed and designated as active. The clicked tab is designated as the active tab by adding the class "active-tab." To choose the tab based on its onclick attribute, it also uses document.querySelector.
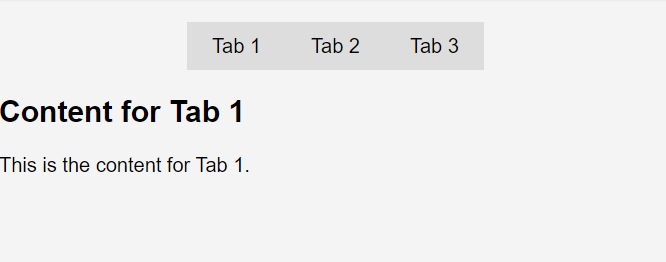
All in all, when you launch the index.html file in any browser, the following should appear:
 ← Prev
Next →
← Prev
Next →