HTML Dynamic Form
How to Use JavaScript to Construct a form Dynamically
Using the Document Object Model (DOM) functions createElement(), setAttribute(), and appendChild(), one may create a completely dynamic HTML form. With the aid of these DOM techniques, we may create a dynamic HTML form. To create this dynamic form, we will create each element within the script tag, modify its attribute to add functionality, and then attach it to the element's parent after our element is ready to use. Therefore, any element attached to the parent form tag is a child element.
Syntax
The syntax applied to this task.
- The createElement() function can create any HTML element. Examples include div, button, p, label, and so forth.
document.createElement(elements);
- To put an attribute in an element, use the setAttribute() function (document.createElement(elements);). A key value pair containing the value is supplied into the setAttribute() function. For instance, ("placeholder," "Name,"), ("type," "submit,"), ("value," "submit,") and so on.
element.setAttribute(“Key”,“Value”);
- The element we constructed using the createElement() function is inserted into any body tag using the appendChild() method. The appendChild() function receives the direct element's element reference as a parameter.
parentElement.appendChild(element);
Step 1: Using your editor, create a basic HTML boilerplate code. Additionally, make a button and a form tag so that our dynamic form can be loaded inside of them.
Step 2: Within the script tag, create a javascript arrow function.
Step 3: Use the document to obtain the form into a variable.getElementById() since the id name defines the form tag.
Step 4: At this point, begin creating your dynamic shape. Use the document's createElement() function to create a new element.
var userName = document.createElement("input");
Step 5: Use the setAttribute() function to set the attribute in the element that was created above.
userName.setAttribute("placeholder", "Name");
Step 6: Append the previously formed element with the id name "dform" to the parent element "form" using the appendChild() function.
dform.appendChild(userName);
Step 7: Completing all mandatory areas on the form requires reiterating the actions from actions 4 through 6.
Step 8: Use createElement() to create a new element div. Additionally, create two buttons, submit and reset, respectively, and add them to the element.
Step 9: Select the "Generate Form" button to initiate the "gForm()" function, which will produce a dynamic form.
Example
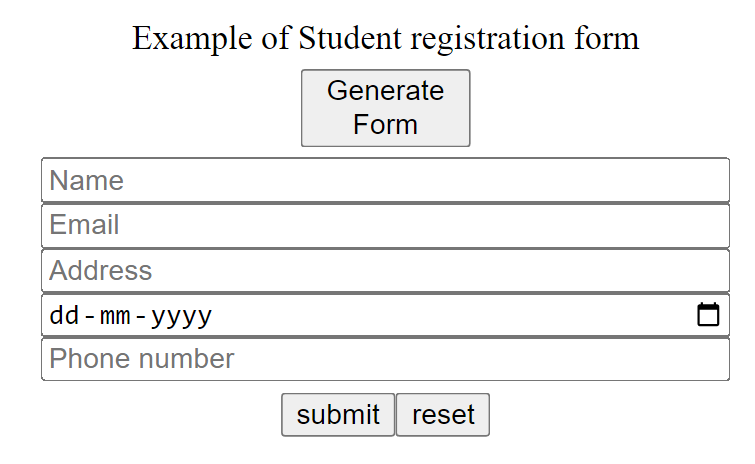
In the example provided, we used Javascript to create a form. As a result, no element inside the form tag is constructed with the same level of staticity as those inside the body tag. The form has fields where students can register. These fields—name, email, address, date of birth, and phone number—are all dynamically generated using script tags.
<html>

<head>

   <title>Create form dynamically with js</title>

</head>

   <body style="height: 70vh; width: 40%;display:flex;flex-direction: column;place-content: center; margin: auto;">

   <p style="margin: 0 auto;">Example of Student registration form</p>

   <button style="margin: 0.3rem auto;width: 5rem;" onclick="Form()"> Generate Form </button>

   <form id="dynamicForm"> </form>

   <script>

      Form = () => {

         var dform = document.getElementById("dynamicForm");

         dform.setAttribute("style", "display:flex;flex-direction:column")

         var userName = document.createElement("input");

         userName.setAttribute("placeholder", "Name");

         dform.appendChild(userName);

         var userEmail = document.createElement("input");

         userEmail.setAttribute("placeholder", "Email");

         userEmail.setAttribute("type", "email");

         dform.appendChild(userEmail);

         var userAdd = document.createElement("input");

         userAdd.setAttribute("placeholder", "Address");

         dform.appendChild(userAdd);

         var userDob = document.createElement("input");

         userDob.setAttribute("placeholder", "D.O.B");

         userDob.setAttribute("type", "date");

         dform.appendChild(userDob);

         var userPhn = document.createElement("input");

         userPhn.setAttribute("placeholder", "Phone number");

         dform.appendChild(userPhn);

         var sBtn = document.createElement("input");

         sBtn.setAttribute("value", "submit");

         sBtn.setAttribute("type", "submit");

         var rBtn = document.createElement("input");

         rBtn.setAttribute("value", "reset");

         rBtn.setAttribute("type", "reset");

         var btns = document.createElement("div");

         btns.setAttribute("style","margin:0.3rem auto")

         dform.appendChild(btns);

         btns.appendChild(sBtn);

         btns.appendChild(rBtn);

      }

   </script>

</body>

</html>
Output
Explanation for the above code
The outcome of the example above, which shows the button to produce a student registration form, is seen in the image below. If you do not click the produce form button, the page that appears is basic and looks like the one below.
The script tag's arrow function is activated when the "Generate Form" button above is pressed. The result is a dynamically produced form with all the fields needed for student registration.
Conclusion
By completing this assignment, we may construct any dynamic element on our website. Because the server does not have to react to a large, bulky piece of code at the beginning of the page loading process, the dynamic content on the page speeds up page loading times. The page is also more engaging because of its dynamic shape.