Basic HTML Codes
The coding that organizes a web page's content is called HTML (HyperText Markup Language). Content could be organized, for instance, using data tables and graphics, a series of bulleted points, or a series of paragraphs. This article will provide you with an introduction to HTML and its functions, as the title implies.
What is HTML?
The markup language HTML establishes the organization of your content. HTML is made up of a number of elements that you can employ to wrap or enclose different parts of the material to give it a certain look or behavior. The surrounding tags provide the ability to italicize text, change the font size, make a word or image hyperlink to another location, and more.
The following are our element's principal components:
- The Opening tag: This is the element's name, e.g., p, encircled by angle brackets for the opening and closing positions. It indicates the point at which the element starts to operate, in this example, the beginning of the paragraph.
2. The closing tag: The closing tag is identical to the opening tag, with the exception that a forward slash precedes the element name. This indicates the end of the element, in this example, the end of the paragraph. One of the common rookie mistakes is forgetting to add a closing tag, which can have odd consequences.
3. The Content: The element's content, in this case only text, is referred to as its content.
4. The Element: The element consists of the content, the opening and closing tags, and the element itself.
Nesting Elements
Nesting is the practice of nesting items inside other elements. To convey the idea that our cat is extremely grumpy, we may include the word "very" in a <strong> element, signifying that it should be given significant emphasis:
<p>My cat is <strong>very</strong> grumpy.</p>
Nonetheless, you must ensure that your pieces are correctly nested. Since the <strong> element was opened before the <p> element in the previous example, we must shut the <strong> element before closing the <p> element. The information below is false:
<p>My cat is <strong>very grumpy.</p></strong>
Void Elements
Void elements are those that are devoid of any content. Consider the <img> element that is present in our HTML page already:
<img src="images/firefox-icon.png" alt="My test image" />
There are two attributes present here, but no inner content or closing tag. This is because an image element cannot influence content by wrapping around it. Its objective is to incorporate a picture into the HTML page where it appears.
Anatomy of an HTML Document
That covers the fundamentals of individual HTML elements; however, they could be more useful with others. We will now examine how a single HTML page is put together from its constituent parts.
<!doctype html>

<html lang="en-US">

  <head>

    <meta charset="utf-8" />

    <meta name="viewport" content="width=device-width" />

    <title>My test page</title>

  </head>

  <body>

    <img src="images/firefox-icon.png" alt="My test image" />

  </body>

</html>
- Doctype is <!DOCTYPE html>. This preface is necessary. Back in the day, when HTML was still in its infancy (about 1991–1992), doctypes served as pointers to a set of guidelines that an HTML page needed to adhere to in order to be deemed proper HTML. These guidelines may include automatic error checking and other helpful features. These days, though, they have little purpose and are essentially only required to ensure that your document operates as intended. Right now, that's all you need to know.
- <html></html> — the element <html>. Often referred to as the root element, this element contains all of the material on the page. The predominant language of the document is set via the lang property, which is also included.
- The <head> element is <head></head>. This element serves as a container for whatever you wish to have on the HTML page that isn't what visitors to your page will see. This comprises character set declarations, CSS to design our content, keywords and a description of your page that you want to show up in search results, and more.
- With a meta charset of "utf-8," — This element sets the UTF-8 character set, which contains the majority of characters from the great majority of written languages, as the character set your page should use. It can basically now handle whatever text that you choose to put on it. Setting this is completely unnecessary and can help avert some issues down the road.
- "width=device-width" text in <meta name="viewport"> — In order to avoid mobile browsers rendering websites wider than the viewport and then shrinking them down, this viewport element makes sure the page renders at the width of the viewport.
- The <title> element is <title></title>. This determines the title of your page, which shows up in the tab that opens in your browser when the page loads. Additionally, it describes the page when you favorite or bookmark it.
- The <body> element is <body></body>. This is everything you want viewers to see when they visit your page, including text, photos, games, movies, audio files that may be played, and more.
Images

It embeds a picture into the main page in the position where it appears. The location of the image file is contained in the src (source) element, which is how it accomplishes this.
An alt attribute, or alternative, has also been added. You can provide descriptive text in the alt attribute for viewers who are unable to see the image, possibly for the following reasons:
- They have vision impairments. Screen readers are devices that assist users who have severe visual impairments in hearing aloud the alt text.
- The image is not displaying because of a problem. Try purposefully altering the path inside your src property, for instance, to make it false. The image should be replaced with something like this if you save and reload the page:
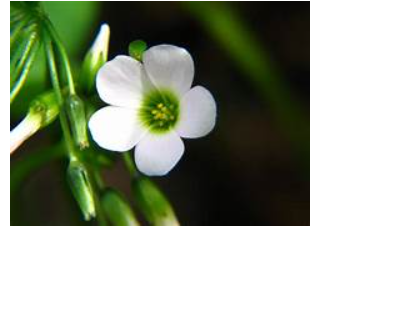
The term "descriptive text" is used as the alt text keyword. You should add enough information in the alt text so that the viewer understands the meaning of the image. In this case, the language we now have for "My test image" is completely inadequate.
Headings in HTML
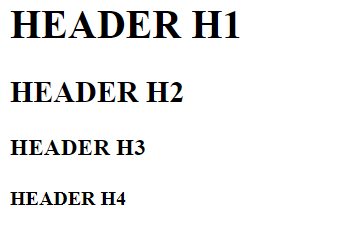
You can designate specific sections of your content as headings or subheadings by using header elements. An HTML document can have subtitles, chapter titles, and an overall title, just like a book. Although there are six heading levels in HTML (<h1> through <h6>), you usually only use three or four at most:
<!-- 4 heading levels: -->

<h1> HEADER H1 </h1>

<h2> HEADER H2 </h2>

<h3> HEADER H3 </h3>

<h4> HEADER H4 </h4>
- HTML headers offer useful information by emphasizing crucial subjects and the document's structure; therefore, they should be optimized carefully to increase user engagement.
- Avoid using headers to accentuate the boldness or size of your content. Instead, use them to draw attention to your document's heading and display its structure.
- Use headers on your webpage carefully. Search engines, like Google, use them to index the content and structure of web pages.
- Use <h1> headings as the primary headers on your page, then <h2> headings, <h3> headings (which are less significant), and so on.
Paragraphs in HTML
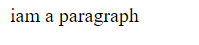
The <p> tag is used to denote an HTML paragraph. The text of a paragraph is typed inside the opening and closing tags, which are present in every paragraph. similar to: <p>... </p>
<p>iam a paragraph</p>
In HTML, paragraphs are defined using the <p> element.
- The <p> tag inherently inserts white space both before and after paragraphs.
- Browsers ignore multiple spaces and treat them as a single space if they are introduced to material inside the <p> tag.
- Browsers also ignore multiple lines and consider them as single lines when there are several lines in a paragraph. Take a look at the sample below.
<p>This       paragraph has multiple     spaces, as you can see.</p>

      <p>This paragraph

      has multiple

              lines, but the browser will

              omit them.</p>

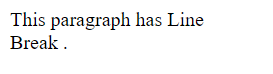
Line Breaks in HTML
The <br> tag in HTML defines a line break.
To alter a line within a paragraph, add the <br> element, and the line will be modified.
<p>This paragraph has Line <br>Break .</p>
Lists in HTML
The web contains a lot of list-based material, and HTML includes specific components for lists. Lists that are marked up always have two or more components. Unordered and ordered lists are the two most used list types:
- Unordered lists are used for lists like shopping lists where the elements' order is irrelevant. The <ul> element encloses these.
- Ordered lists are used for lists when the components' placement is important, like in a recipe. The <ol> element encloses these.
A <li> (list item) element contains each item in the list.
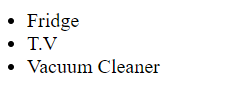
Unordered lists of items have the <ul> element as their parent element. One or more <li> list item elements are a <ul>'s only children. Let's enumerate the machines. Because the order is irrelevant, we utilize an unordered list.
<ul>

  <li>Fridge</li>

  <li>T.V</li>

  <li>Vacuum Cleaner</li>

</ul>
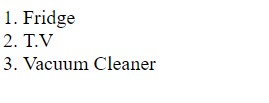
The parent element for ordered lists of items is the <ol> element. A <ol> can have only one or more <li> elements or list items, as children. In this instance, however, the "bullets" are integers of many different kinds. In CSS, the type can be declared using the type attribute or the list-style-type property.
<ol>

  <li>Fridge</li>

  <li>T.V</li>

  <li>Vacuum Cleaner</li>

</ol>
Div
One of the most utilized container components in HTML is the <div> tag, which stands for "division". It is a block-level container used to combine other HTML elements and apply scripting or styling to them all at once.
The <div> element, in this instance, encircles an unordered list (<ul>) and a paragraph (<p>). You may use CSS or JavaScript to add styles to this grouping and manage these items together.
<div>

  <p>This is a paragraph inside a div.</p>

  <ul>

    <li>List item 1</li>

    <li>List item 2</li>

  </ul>

</div>
Note: The <div> tag is frequently used for layout, aiding in the organization of a webpage's content. HTML5 added additional semantic tags, such as <section>, <article>, <header>, <footer>, and so on, with more semantic and particular meanings. These elements improve clarity regarding the purpose of the material.
Semantic Tags
Semantic Tags are unique labels that inform web browsers and developers about the contents of various areas of a webpage. They contribute to the ease of understanding of webpages by both machines and humans. You may increase the accessibility and discoverability of your web pages on search engines by utilizing these tags. Here are some examples of typical semantic HTML tags:
- <nav>: To specify navigation links on your webpage, use the nav tag. It has links pointing to other internet pages or sections.
Example:
<nav>

  <ul>

    <li><a href="#">Home</a></li>

    <li><a href="#">About</a></li>

    <li><a href="#">Contact</a></li>

  </ul>

</nav>
2. <main>: Used to identify a web page's primary content. It makes your HTML code more readable and more logical since it makes the primary content area obvious to screen readers and other assistive devices. It also aids in search engines' comprehension of the page's content's relevancy, which can enhance the Search Engine Optimization (SEO) of your website.
Example:
<main>

  <article>

    <h2>Title of the Page</h2>

    <p>Page content goes here</p>

  </article>

</main>
3. <header>: The header tag denotes content that is introduced at the start of a webpage or section. Typically, it has navigation menus, logos, and other opening components.
Example:
<header>

  <h1>Website Title</h1>

  <nav>

    <ul>

      <li><a href="#">Home</a></li>

      <li><a href="#">About</a></li>

      <li><a href="#">Contact</a></li>

    </ul>

  </nav>

</header>
Span Tag
To organize and apply styles to inline items or text, use the <span> tag, a general inline container that doesn't cause a line break. Usually, you would use it to apply styles or to change text inside a bigger block of content by using JavaScript on some parts of the text without changing the material's main structure.
This is an illustration of how to use the <span> tag in HTML:
<p>This is a <span style="color: red; font-weight: bold;">highlighted</span> text.</p>
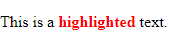
In this example, the inline styles added to the <span> element specify that the word "highlighted" should be strong and red.
Links
To provide a connection between a document and an outside resource, use the <link> tag. Including external resources, such as stylesheets, icons, and other documents, is its main goal. Now let's examine the typical use for the <link> tag:
The most popular application of the <link> element is to establish a connection between an HTML page and an external CSS (Cascading Style Sheets) file. This makes it easier to maintain and update your website by enabling you to keep the styling independent of the structure.
<link rel="stylesheet" type="text/css" href="styles.css">
In this example, the href element shows the URL to the external CSS file, the type attribute identifies the kind of linked resource (text/css for stylesheets), and the rel-tag describes the relationship between the HTML content and the stylesheet. It is recommended to link a CSS file within the <head> element.
Linking icon: Another popular application for the <link> element is to link a webpage's favicon, which is the little symbol that shows up in the browser tab or next to the URL in the address bar.
<link rel="icon" href="favicon.ico" type="image/x-icon">
Here, the location of the icon file is specified by the href property, and the rel attribute is set to "icon" to denote that it is an icon file. The type property, image/x-icon for icons, specifies the type of linked file.
Connecting external documents: You may link to other external pages with the <link> tag, like this:
- Stylesheet for printing: Let's say you have a unique layout for printing your webpage. You may link your webpage to an independent stylesheet created just for printing using the <link> tag. In this manner, your page will print neatly and professionally.
- Different versions of a document (such as translations): You may occasionally have many webpage versions for various languages or uses. You may link your webpage to these alternate versions using the <link> tag.
- Feeds for content syndication: Suppose you run a blog and want people to be able to view your most recent entries with ease. By linking your webpage to a feed, which functions as a stream of your most recent material, the <link> element might be helpful.
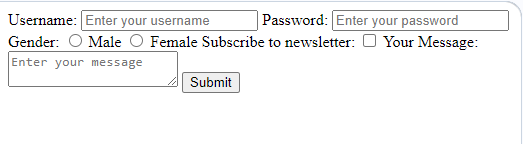
Tag for form
On websites, HTML forms are necessary for user interaction. They let users enter data that can be forwarded to a server for handling. An HTML form's fundamental structure consists of several essential components:
<form>

  <!-- Your form elements go here -->

</form>
The start and finish of your form are indicated by the
The start and finish of your form are indicated by the <form> tag. It serves as a container for other form components. Label, input type, textarea, and button tags are typically stored there.
Label
An input element's label is defined using the <label> tag. For instance:
<label for="name">Full Name</label>
Type of Input
Distinct input types have distinct functions in a form. An interactive element that allows users to add data is defined by the input(<input>) tag. Some of the commonly used tags:
1.Text Input:
<input type="text" name="username" placeholder="Enter your username">
2. Password Input:
<input type="password" name="password" placeholder="Enter your password">
3.Checkboxes:
<input type="checkbox" name="confirmDetails" value="yes"> Confirm the details
4. Textarea:
The <textarea> tag defines a multi-line text input control commonly used within form elements.
Example:
<textarea name="message" placeholder="Enter your message"></textarea>
Button (to submit forms online)
For a form to be useful, it must enable users to submit their input. You can submit this by using a button (<button>) tag:
<button type="submit">Submit</button>
A clickable button is created with the tag<button>. The form will be submitted by clicking this button, as indicated by the type="submit" property.
Note:
- Make sure that all of your form elements have a name attribute. It facilitates the server's data processing and identification.
- Give users a hint about the type of input that is expected by using the placeholder attribute.
- When selecting input types, take the user experience into account. For mutually exclusive possibilities, for example, use radio buttons.
This is a sample of code that shows how to use a form element:
<!DOCTYPE html>

<html>

  <head> </head>

  <body>

    <form>

  <label for="username">Username:</label>

  <input type="text" id="username" name="username" placeholder="Enter your username">

  <label for="password">Password:</label>

  <input type="password" id="password" name="password" placeholder="Enter your password">

  <label>Gender:</label>

  <input type="radio" name="gender" value="male"> Male

  <input type="radio" name="gender" value="female"> Female

  <label>Subscribe to newsletter:</label>

  <input type="checkbox" name="subscribe" value="yes">

  <label for="message">Your Message:</label>

  <textarea id="message" name="message" placeholder="Enter your message"></textarea>

  <button type="submit">Submit</button>

</form>

  </body>

</html>
Anchor Tag
To establish anchor points or hyperlinks on a webpage, utilize the anchor tag denoted by <a>. Its main purpose is to specify a hyperlink, which enables visitors to go to an external resource, another webpage, or even a different area of the same page.
<a href="https:// www.google.com ">Visit www.google.com</a>