How to Add Picture in HTML
Adding images to your HTML documents can significantly enhance the visual appeal and user experience of your web pages. Whether you want to include photos, illustrations, diagrams, or any other visual element, HTML provides straightforward methods to incorporate images seamlessly into your content. In this beginner's guide, we'll explore various ways to add pictures to your HTML documents.
1. Using the <img> Tag:
The most common way to add images in HTML is by using the <img> tag. Here's a basic example:
Code:
<!DOCTYPE html>

<html lang="en">

<head>

    <meta charset="UTF-8">

    <meta name="viewport" content="width=device-width, initial-scale=1.0">

    <title>Adding Pictures</title>

    <style>

        body {

            font-family: Arial, sans-serif;

            margin: 0;

            padding: 0;

        }

        header {

            background-color: #333;

            color: #fff;

            padding: 20px;

            text-align: center;

        }

        main {

            padding: 20px;

        }

        .image-section {

            text-align: center;

        }

        img {

            max-width: 100%;

            height: auto;

        }

    </style>

</head>

<body>

    <header>

        <h1>JTP</h1>

    </header>

    <main>

        <section class="image-section">

            <img src="Assets/bitcoins.jpg" alt="Img">

        </section>

    </main>

</body>

</html>
Output:

In this example, the <img> tag is used to embed an image named "image.jpg". The src attribute specifies the path to the image file, and the alt attribute provides alternative text for the image, which is essential for accessibility and SEO purposes.
2. Relative and Absolute Paths:
When specifying the src attribute, you can use either a relative or an absolute path. Relative paths are specified relative to the current web page's location, while absolute paths include the full URL to the image. Here are examples of both:
Relative path:
Code:
<!DOCTYPE html>

<html lang="en">

<head>

    <meta charset="UTF-8">

    <meta name="viewport" content="width=device-width, initial-scale=1.0">

    <title>Adding Pictures</title>

    <style>

        body {

            font-family: Arial, sans-serif;

            margin: 0;

            padding: 0;

        }

        header {

            background-color: #333;

            color: #fff;

            padding: 20px;

            text-align: center;

        }

        main {

            padding: 20px;

        }

        .image-section {

            text-align: center;

        }

        img {

            max-width: 100%;

            height: auto;

        }

    </style>

</head>

<body>

    <header>

        <h1>JTP</h1>

    </header>

    <main>

        <section class="image-section">

            <img src="Assets/bitcoins.jpg" alt="Description">

        </section>

    </main>

</body>

</html>
Output:
Absolute Path:
Code:
<!DOCTYPE html>

<html lang="en">

<head>

    <meta charset="UTF-8" />

    <meta name="viewport" content="width=device-width, initial-scale=1.0" />

    <title>JTP</title>

    <style>

        body {

            font-family: Arial, sans-serif;

            margin: 0;

            padding: 0;

        }

        header {

            background-color: #333;

            color: #fff;

            padding: 20px;

            text-align: center;

        }

        main {

            padding: 20px;

        }

        .image-section {

            text-align: center;

        }

        img {

            max-width: 100%;

            height: auto;

        }

    </style>

</head>

<body>

    <header>

        <h1>JTP</h1>

    </header>

    <main>

        <section class="image-section">

            <img src="https://img.freepik.com/free-photo/top-view-meals-tasty-yummy-different-pastries-dishes-brown-surface_140725-14554.jpg?w=740&t=st=1707847369~exp=1707847969~hmac=48e9ef8351bd4f85f15249b3b4010d422af3af4870f87d9440fe7fcbbf2ca8f1"

                alt="Description" />

        </section>

    </main>

</body>

</html>
Output:

3. Image Size and Alignment:
You can control the size and alignment of images using CSS or HTML attributes. For example:
Code:
<!DOCTYPE html>

<html lang="en">

<head>

    <meta charset="UTF-8" />

    <meta name="viewport" content="width=device-width, initial-scale=1.0" />

    <title>JTP</title>

    <style>

        body {

            font-family: Arial, sans-serif;

            margin: 0;

            padding: 0;

        }

        header {

            background-color: #333;

            color: #fff;

            padding: 20px;

            text-align: center;

        }

        main {

            padding: 20px;

        }

        .image-section {

            text-align: center;

        }

        img {

            max-width: 100%;

            height: auto;

        }

    </style>

</head>

<body>

    <header>

        <h1>JTP</h1>

    </header>

    <main>

        <section class="image-section">

            <img src="Assets/JTP_logo.png" alt="Description" width="300" height="200" style="float: right;">

        </section>

    </main>

</body>

</html>
Output:
In this example, the width and height attributes define the dimensions of the image, while the style attribute applies CSS for aligning the image to the right.
4. Responsive Images:
To ensure that images scale appropriately on different devices and screen sizes, you can use the max-width property in CSS:
Code:
<!DOCTYPE html>

<html lang="en">

<head>

    <meta charset="UTF-8" />

    <meta name="viewport" content="width=device-width, initial-scale=1.0" />

    <title>JTP</title>

    <style>

        body {

            font-family: Arial, sans-serif;

            margin: 0;

            padding: 0;

        }

        header {

            background-color: #333;

            color: #fff;

            padding: 20px;

            text-align: center;

        }

        main {

            padding: 20px;

        }

        .image-section {

            text-align: center;

        }

        img {

            max-width: 100%;

            height: auto;

        }

    </style>

</head>

<body>

    <header>

        <h1>JTP</h1>

    </header>

    <main>

        <section class="image-section">

            <img src="Assets/JTP_logo.png" alt="Description" style="max-width: 100%;">

        </section>

    </main>

</body>

</html>
Output:

This ensures that the image will never exceed the width of its containing element.
5. Image Formats:
HTML supports various image formats such as JPEG, PNG, GIF, SVG, etc. Choose the appropriate format based on your specific requirements for quality, transparency, and scalability.
6. Image Accessibility:
Ensuring accessibility is crucial when adding images to HTML. The alt attribute in the <img> tag provides alternative text that describes the image. Screen readers use this text to convey the content of the image to visually impaired users. Always provide descriptive and meaningful alternative text to enhance accessibility.
Code:
<!DOCTYPE html>

<html lang="en">

<head>

    <meta charset="UTF-8" />

    <meta name="viewport" content="width=device-width, initial-scale=1.0" />

    <title>JTP</title>

    <style>

        body {

            font-family: Arial, sans-serif;

            margin: 0;

            padding: 0;

        }

        header {

            background-color: #333;

            color: #fff;

            padding: 20px;

            text-align: center;

        }

        main {

            padding: 20px;

        }

        .image-section {

            text-align: center;

        }

        img {

            max-width: 100%;

            height: auto;

        }

    </style>

</head>

<body>

    <header>

        <h1>JTP</h1>

    </header>

    <main>

        <section class="image-section">

            <img src="image.jpg" alt="A person hiking in the mountains">

        </section>

    </main>

</body>

</html>
Output:

7. Image Links:
You can turn images into clickable links by wrapping the <img> tag within an <a> (anchor) tag. This is useful for creating image-based navigation or linking to other pages or resources.
Code:
<!DOCTYPE html>

<html lang="en">

<head>

    <meta charset="UTF-8" />

    <meta name="viewport" content="width=device-width, initial-scale=1.0" />

    <title>JTP</title>

    <style>

        body {

            font-family: Arial, sans-serif;

            margin: 0;

            padding: 0;

        }

        header {

            background-color: #333;

            color: #fff;

            padding: 20px;

            text-align: center;

        }

        main {

            padding: 20px;

        }

        .image-section {

            text-align: center;

        }

        img {

            max-width: 100%;

            height: auto;

        }

    </style>

</head>

<body>

    <header>

        <h1>JTP</h1>

    </header>

    <main>

        <section class="image-section">

            <a href="https://www.javatpoint.com/">

                <img src="Assets/JTP_logo.png" alt="Description">

            </a>

        </section>

    </main>

</body>

</html>
Output:

OnClick:
8. Lazy Loading:
To improve page load performance, especially for pages with many images, consider implementing lazy loading. Lazy loading delays the loading of images until they are about to come into view, reducing initial page load time. This can be achieved using the loading="lazy" attribute in modern browsers:
Code:
<!DOCTYPE html>

<html lang="en">

<head>

    <meta charset="UTF-8" />

    <meta name="viewport" content="width=device-width, initial-scale=1.0" />

    <title>JTP</title>

    <style>

        body {

            font-family: Arial, sans-serif;

            margin: 0;

            padding: 0;

        }

        header {

            background-color: #333;

            color: #fff;

            padding: 20px;

            text-align: center;

        }

        main {

            padding: 20px;

        }

        .image-section {

            text-align: center;

        }

        img {

            max-width: 100%;

            height: auto;

        }

    </style>

</head>

<body>

    <header>

        <h1>JTP</h1>

    </header>

    <main>

        <section class="image-section">

            <img src="Assets/JTP_logo.png" alt="Description" loading="lazy">

        </section>

    </main>

</body>

</html>
Output:

9. Background Images:
In addition to using the <img> tag, you can also set images as backgrounds for HTML elements using CSS. This technique provides more flexibility in terms of positioning and styling of images.
Code:
<!DOCTYPE html>

<html lang="en">

<head>

    <meta charset="UTF-8" />

    <meta name="viewport" content="width=device-width, initial-scale=1.0" />

    <title>JTP</title>

    <style>

        body {

            font-family: Arial, sans-serif;

            margin: 0;

            padding: 0;

        }

        header {

            background-color: #333;

            color: #fff;

            padding: 20px;

            text-align: center;

        }

        main {

            padding: 20px;

        }

        .image-section {

            text-align: center;

        }

        img {

            max-width: 100%;

            height: auto;

        }

        .background-image {

            background-image: url('./Assets/slider1.jpg');

            background-size: cover;

            height: 300px;

        }

    </style>

</head>

<body>

    <header>

        <h1>JTP</h1>

    </header>

    <main>

        <section class="image-section">

            <div class="background-image">

                <!-- Content goes here -->

            </div>

        </section>

    </main>

</body>

</html>
Output:

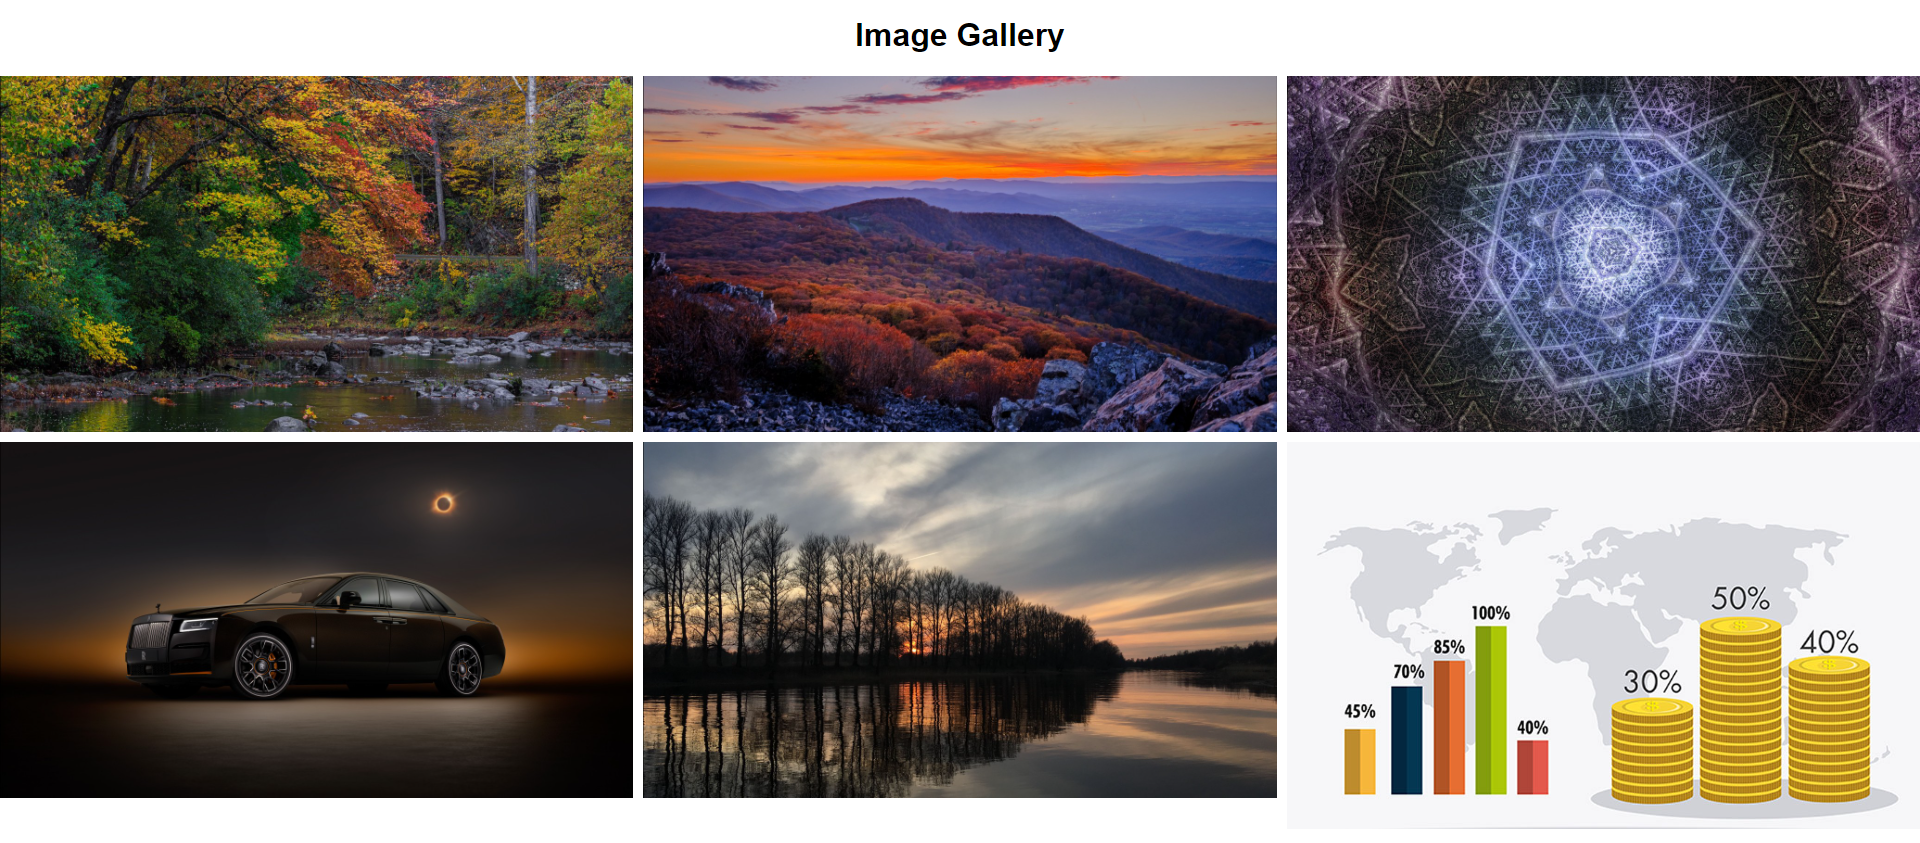
10. Image Galleries:
Creating image galleries is a common requirement for many websites, especially those showcasing portfolios, products, or photography. You can achieve this by organizing multiple images within a structured layout using HTML and CSS. Here's a basic example:
Code:
<!DOCTYPE html>

<html lang="en">

<head>

    <meta charset="UTF-8">

    <meta name="viewport" content="width=device-width, initial-scale=1.0">

    <title>JTP</title>

    <style>

        body {

            font-family: Arial, sans-serif;

            margin: 0;

            padding: 0;

        }

        h1{

            text-align: center;

        }

        .gallery {

            display: grid;

            grid-template-columns: repeat(auto-fill, minmax(25%, 1fr));

            grid-gap: 10px;

        }

        .gallery img {

            width: 100%;

            height: auto;

        }

    </style>

</head>

<body>

    <header>

        <h1>Image Gallery</h1>

    </header>

    <main>

        <div class="gallery">

            <img src="/Assets/slider1.jpg" alt="Image 1">

            <img src="/Assets/slider2.jpg" alt="Image 2">

            <img src="/Assets/slider3.jpg" alt="Image 3">

            <img src="/Assets/slider4.jpg" alt="Image 4">

            <img src="/Assets/slider5.jpg" alt="Image 5">

            <img src="/Assets/bitcoins.jpg" alt="Image 6">

        </div>

    </main>

</body>

</html>
Output:
Advantages:
1. Enhanced Visual Appeal:
Images add visual interest and attractiveness to web pages, making them more engaging for visitors.
Well-chosen images can convey information, emotions, and concepts more effectively than text alone.
2. Improved User Experience:
Visual elements, including images, contribute to a more enjoyable and memorable browsing experience.
Images can help break up long blocks of text, making content easier to digest and understand.
3. Increased Engagement:
Compelling images can capture the attention of users and encourage them to interact with your website or explore its content further.
Image-based navigation or calls to action can prompt users to take desired actions, such as clicking through to other pages or making a purchase.
4. Accessibility:
Alternative text (specified using the alt attribute) ensures that images are accessible to users with disabilities, including those who rely on screen readers.
Images can enhance accessibility by providing visual cues or supplementary information for users with different needs.
5. SEO Benefits:
Optimized images with descriptive filenames and alt text can improve the visibility of web pages in search engine results.
Image search engines can drive additional traffic to your website if your images are appropriately tagged and indexed.
Disadvantages:
1.Increased Page Load Time:
Large or unoptimized images can slow down page loading times, leading to a poor user experience and potentially higher bounce rates.
Mobile users, in particular, may face longer loading times and increased data usage if images are not optimized for smaller screens and slower connections.
2. Bandwidth Usage:
Websites with heavy image content can consume significant amounts of bandwidth, especially for users on limited data plans or slow internet connections.
Excessive bandwidth usage may incur additional costs for website owners, particularly if hosting or bandwidth quotas are exceeded.
3. Compatibility Issues:
Different browsers and devices may handle images differently, leading to inconsistencies in how images are displayed or rendered.
Compatibility issues may arise with certain image formats, CSS styles, or responsive design techniques, requiring additional testing and optimization efforts.
4. Copyright and Licensing:
Using images without proper authorization or licensing can lead to legal issues and copyright infringement claims.
Website owners must ensure that they have the necessary rights or permissions to use images, whether obtained from stock photo websites, licensed sources, or created in-house.
5. Accessibility Challenges:
While images can enhance accessibility when used appropriately, they may also present challenges for users with certain disabilities, such as visual impairments or cognitive disabilities.
Ensuring that images are described accurately and meaningfully with alternative text is essential for maintaining accessibility standards.
Applications:
1. E-Commerce Websites:
E-commerce platforms heavily rely on images to showcase products effectively. High-quality product images from various angles help customers make informed purchasing decisions.
Features like zoom functionality and image galleries allow users to examine products in detail before making a purchase.
2. Educational Resources:
Educational websites and online learning platforms use images to supplement text-based content, making complex concepts easier to understand.
Diagrams, illustrations, and visual aids enhance learning experiences by providing visual representations of ideas and theories.
3. Travel and Tourism:
Websites in the travel and tourism industry leverage images to showcase destinations, accommodations, attractions, and activities.
Stunning photographs of landscapes, landmarks, and local culture inspire travelers and help them plan their trips effectively.
4. News and Media:
News websites and media outlets incorporate images to accompany articles and news stories, providing context and visual interest.
Photojournalism relies on powerful images to convey emotions, capture events, and tell compelling stories that resonate with audiences.
5. Social Media Platforms:
Social media platforms are built around visual content, with images playing a central role in user engagement and interaction.
Users share photos, memes, infographics, and other visual content to express themselves, connect with others, and convey information.
6. Corporate Websites:
Corporate websites use images to represent brand identity, showcase products or services, and communicate company values and culture.
Team photos, office environments, and product demonstrations humanize the brand and build trust with potential customers.
7. Portfolio Websites:
Artists, designers, photographers, and creatives showcase their work on portfolio websites, where images take center stage.
High-quality images effectively demonstrate skills, creativity, and style, attracting potential clients or collaborators.
8. Real Estate Listings:
Real estate websites feature images of properties, both interior and exterior, to attract potential buyers or renters.
Detailed photographs give viewers a sense of the property's layout, features, and condition, facilitating decision-making and property comparisons.
9. Health and Wellness:
Health and wellness websites use images to illustrate exercises, yoga poses, healthy recipes, and lifestyle tips.
Visual representations of fitness routines, nutritional guidelines, and relaxation techniques motivate and inspire visitors to adopt healthier habits.
10. Entertainment and Gaming:
Entertainment websites, gaming platforms, and streaming services utilize images and screenshots to promote movies, games, and TV shows.
Eye-catching visuals, trailers, and promotional artwork create anticipation and drive engagement among fans and audiences.
Conclusion
In conclusion, integrating images into HTML documents offers numerous benefits across a wide range of applications. From enhancing visual appeal and improving user experience to conveying information effectively and driving engagement, images play a crucial role in modern web design and content creation.
While images can significantly enhance the effectiveness and appeal of web pages, it's essential to consider factors such as page load time, accessibility, and copyright compliance. By optimizing images for performance, providing meaningful alternative text for accessibility, and ensuring proper licensing and permissions, website owners can maximize the benefits of incorporating images while mitigating potential drawbacks.
Understanding the various techniques, best practices, and applications of adding images to HTML empowers web developers, designers, and content creators to create visually stunning, engaging, and accessible websites that resonate with audiences and achieve their intended objectives.
As technology continues to evolve and user expectations evolve, the strategic use of images in HTML will remain a fundamental aspect of web development, enabling the creation of dynamic, immersive, and impactful online experiences for users worldwide.