React Native Alert
In this part of the tutorial, we will learn about react-native's alert API. It is compatible with both android and IOS.
What is API?
Answer - API stands for Application programming interface, API allows communication between two software, and it is also responsible for data transmission between two software.
Let us understand API with an example-
Here we can consider that API(Application programming interface) works as a waiter. Suppose you went to a hotel and you ordered some drinks! But did you make that drink by yourself? Obviously, no, because it was the waiter who took the order and also served the order. You do not know what happened in between.
React native Alert: It displays an alert with a particular message. The Alert () method is used to execute this process. Usually, it is a popup.
React native allows three types of alerts -
- Simple Alert
- Two options alert
- Three options alert
Alert Buttons for IOS only -
We can define as many buttons as we want. Each has a style that can be default .
Alert Button for android:-
we can only use three types of buttons on android
- Positive button
- Negative button
- Neutral button
If there is only one button, it will be "OK."
If there are two buttons, it would be "Cancel" and "OK".
If there is a three-button, then it would be "Ask Me Later", "Cancel," and "OK".
Let's work with Alert
Create one separate file, alert_ex.js.
Alert_ex.js code
import React from 'react.'
import {Text, TouchableOpacity, StyleSheet,Alert } from 'react-native'


const Alert_ex = () => {
   const your_Alert = () =>{
      Alert.alert(
         'this is an alert'
      )
   }
   return (
      <TouchableOpacity onPress = {your_Alert} style = {styles.button}>
         <Text style={{fontSize:20}}>Alert</Text>
      </TouchableOpacity>
   )
}
export default Alert_ex


const styles = StyleSheet.create ({
   button: {
      backgroundColor: '#cc00cc',
      alignItems: 'center',
      borderRadius:10,
       Width:100,
      marginTop: 300,
      justifyContent:'center',

   }
})
After updating the code of alert_ex.js, go to your App.js file. We will now export components from react_ex.js to app.js to give the final shape to our app and execute our plan. Make sure to follow the naming convention. If you are changing the name of the file, then you are expected to change the path of the app.js file. write your file name './yourfilename'
Otherwise, you will be facing a bug, and if you are changing the name of the component, then make sure to change the name of the imported file of App.js.
Open your App.js file, remove if any code is there and update the code as follows-
App.js code
import React from 'react.'
import Alert_ex from './alert_ex.js'


const App = () => {
   return (

      <Alert_ex />
   )


}


export default App
Output:
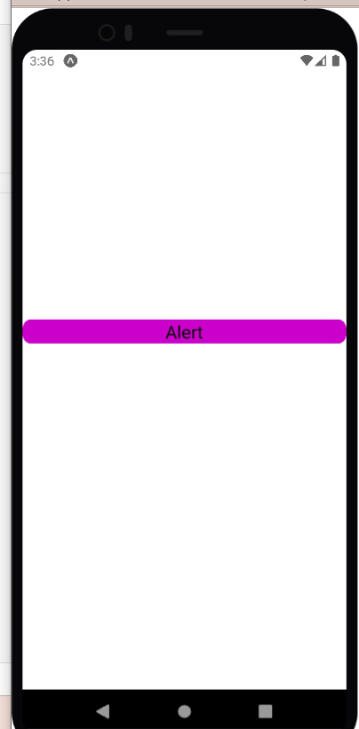
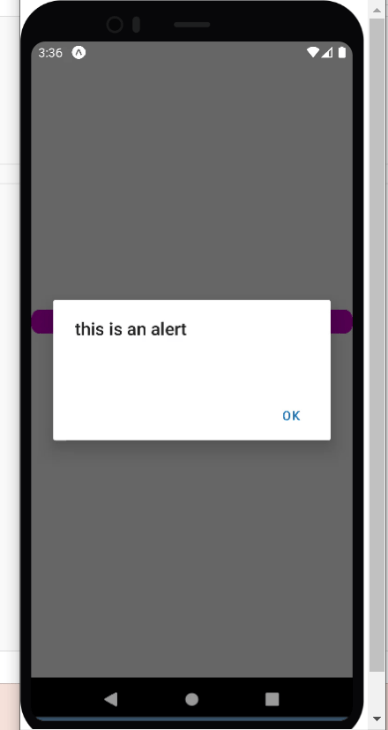
So now click on Alert. What do you see? It shows 'this is an alert', which is an alert. Let us understand the functioning of code.
Alert_ex.js explanation-
<TouchableOpacity onPress = {your_Alert} style = {styles.button}>
Here we have created one button and after pressing that button it will call your_Alert and then we have styled it.
const Alert_ex = () => {
   const your_Alert = () =>{
      Alert.alert(
         'this is an alert'
      ) }
Here we have created one component named Alert_ex, and we have defined another component inside, which is your_alert, and then we have provided an alert inside it. So that is why when the button is pressed, "this is an alert" message is displayed".if you want any other message displayed, then You can edit it.
App.js explanation :
import Alert_ex from './alert_ex.js'
Here we have imported the Alert_ex component from the alert_ex file.


 return (
     <Alert_ex />
   )
Here we have used the component, and the working of this component is explained earlier in the Alert_ex.js file explanation.
The previous Alert has one drawback: we do not have any cancel button, so how will we get back to the home screen.We will now add the cancel feature to our previous project. let us see what will be the code
Alert_ex.js code:
import React from 'react'
import {Text, TouchableOpacity, StyleSheet,Alert } from 'react-native'


const Alert_ex = () => {
   const your_Alert = () =>{
     Alert.alert(
'Our Title for first alert',
[
{
text: 'Cancel',
onPress: () => console.log('End user is not at all interested for it'),
style: 'cancel',
},
{text: 'OK', onPress: () => console.log('End user is interested for it')},
] );


   };
   return (
      <TouchableOpacity onPress = {your_Alert} style = {styles.button}>
         <Text style={{fontSize:20}}>Alert</Text>
      </TouchableOpacity>
   )
}
export default Alert_ex


const styles = StyleSheet.create ({
   button: {
      backgroundColor: '#cc00cc',
      alignItems: 'center',
      borderRadius:10,
       Width:100,
      marginTop: 300,
      justifyContent:'center',

   }
})
App.js file will remain the same.
Output:
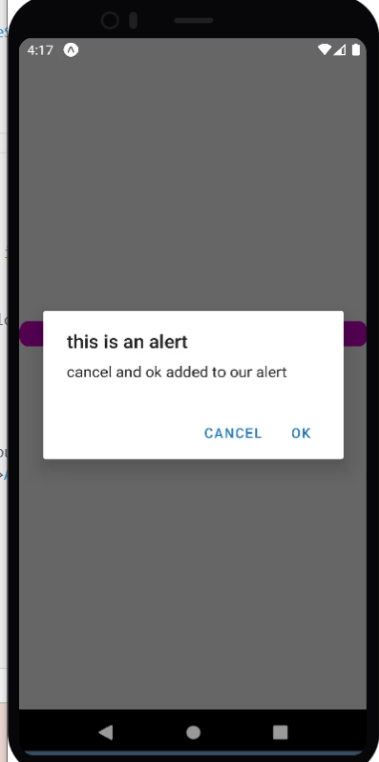
Here we have added cancel and ok.
Explanation :
 const your_Alert = () =>{
     Alert.alert(
'Our Title for first alert',
[
{
text: 'Cancel',
onPress: () => console.log('End user is not at all interested for it'),
style: 'cancel',
},
{text: 'OK', onPress: () => console.log('End user is interested for it')},
] );
If you want to add anything to your Alert, you must follow this structure. Text will represent the displayed text on Alert like cancel is written in text, and you can see cancel on the output screen same goes for OK. Cancel most probably means that the user is not interested that way
The console will be printing 'End-user is not at all interested in it'.